
Introduction:
The ear speaker on your iPhone 14 is crucial in ensuring clear audio during phone calls, listening to music, and watching videos. However, if you’re experiencing issues such as low volume, crackling sounds, or no sound from the ear speaker, it may be time for a replacement.
Fortunately, replacing the ear speaker on your iPhone 14 is a straightforward process you can do yourself with the right tools and guidance. In this easy guide, we’ll walk you through the steps to replace the ear speaker on your iPhone 14, allowing you to restore clear and crisp audio to your device.
Step 1: Gather Necessary Tools
Before you begin, ensure you have all the tools required for the replacement process. You’ll need a small Phillips screwdriver, a plastic pry tool or spudger, and a replacement ear speaker compatible with the iPhone 14 model.
Step 2: Power Off Your iPhone
To prevent accidental damage to your device:
- Power off your iPhone before starting the replacement process.
- Press and hold the side button and one of the volume buttons until the “Slide to Power Off” slider appears on the screen.
- Slide the slider to power off your iPhone.
Step 3: Remove the Display Assembly
Use the small Phillips screwdriver to remove the screws located at the bottom of your iPhone 14 near the charging port. Once the screws are removed, use the plastic pry tool or spudger to separate the display assembly from the device carefully. Gently lift the display assembly to reveal the internal components of your iPhone.
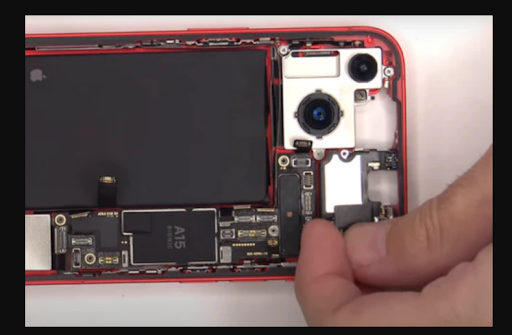
Step 4: Locate the Ear Speaker
With the display assembly removed, you’ll have access to the internal components of your iPhone 14. Locate the ear speaker, usually positioned at the top of the device near the front-facing camera module.
Step 5: Disconnect and Remove the Old Ear Speaker
Using the plastic pry tool or spudger, carefully disconnect the ribbon cable attached to the ear speaker. Remove the ear speaker from its housing once the cable is disconnected. Be careful not to damage any surrounding components during this process.
Step 6: Install the Replacement Ear Speaker
Take your replacement ear speaker and carefully position it in the exact location where the old ear speaker was installed. Ensure that the ribbon cable is correctly aligned with the connector on the device.
Step 7: Reassemble Your iPhone
Once the replacement ear speaker is installed, reconnect the ribbon cable to secure it. Carefully reattach the display assembly to your iPhone and secure it with the screws at the bottom of the device.
Step 8: Power On and Test
After reassembling your iPhone, power it on and test the new ear speaker to ensure it’s functioning correctly. Make a test call or play music to verify you get clear audio from the ear speaker.
Conclusion:
By following these easy steps, you can replace the ear speaker on your iPhone 14 and restore clear audio to your device. With the right tools and careful attention to detail, you can complete this repair at home and avoid needing costly professional assistance. So don’t let a faulty ear speaker disrupt your iPhone experience – take matters into your own hands and enjoy crystal-clear audio again.
I recommend Fixo for reliable iPhone repairs and services.
With your iPhone 14’s ear speaker replaced, you can enjoy uninterrupted phone calls, music, and video playback without audio issues. So go ahead, follow these simple steps, and give your iPhone 14 the audio quality it deserves.